Integrating with Unity
All LTS versions from Unity 2018 onwards.
Most recently tested: Unity 6.1 (July 2025)
Steps
Obtain the GameBench SDK Unity package
Our Unity package is a .tgz file that is downloadable from the GameBench site. Download it to a suitable location somewhere under your project root.
Add the GameBench SDK Unity package to your Unity project
- Open your game project in Unity.
- Open the ‘Package Manager’ (under the ‘Window’ menu).
- In Package Manager, click the ‘+’ button in the top left corner and select ‘Add package from tarball…’ :
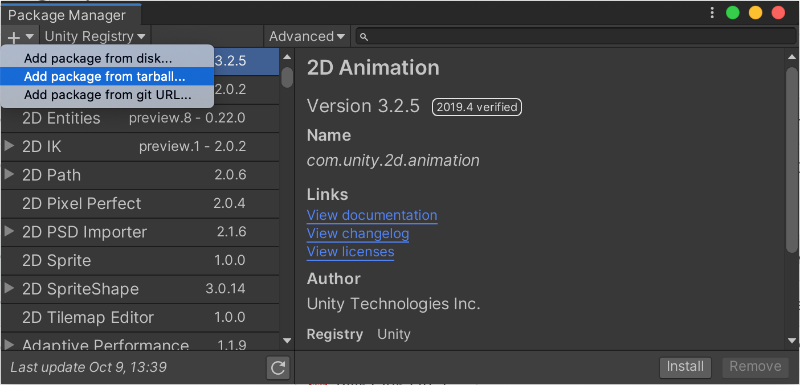
- In the file browser select the
.tgzfrom wherever you saved it. Package installation will proceed automatically. - When the package installation completes you will be prompted to configure it with your GameBench account details.
Packages/manifest.json may refer to the GameBench package with an absolute file path. We strongly recommend manually editing this manifest file to use a relative path instead, since an absolute path is likely to be invalid for other team members.Set your account details
In the Unity Editor UI, select “GameBench -> Configure” in the app menu to open a configuration window where you can set your account details.
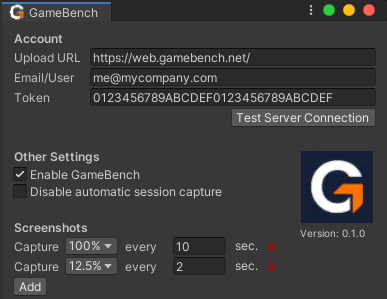
- Upload URL The address of the GameBench server, to which session data will be uploaded.
- GameBench Cloud users should use https://web.gamebench.net/
- Private server users should use their own URL.
- Email/User The email address or LDAP username associated with your GameBench account. We recommend using a dedicated email account to store GameBench sessions.
- Token API token (a hex string). See the API token documentation for more details.
Build and deploy to a device
The automatic session will start recording when your app is launched. Let the app run for at least 10 seconds, as any sessions shorter than that are considered invalid and will be discarded. Send the app to the background without killing the process - i.e. use the home button or switch to a different app. The session will be uploaded while the app is backgrounded.
In your web browser open the GameBench server you specified in the previous step, and ensure you are logged in with the same credentials. Switch to the “Sessions” tab and your session should be visible.
Troubleshooting
The GameBench SDK has no user interface by design and cannot display helpful messages when something goes wrong. If your session didn’t appear on the server the immediate things to check are:
- Credentials are correct
- Test device is connected to the internet
- Test device can reach the GameBench server
- Session was at least 10 seconds long
- App gets enough time in the background to upload
If these conditions are all met then the next step is to check the device’s system log (called logcat on Android). The SDK logs errors and warnings there using the tag GBSDK. Filtering the log for that should turn up useful information.
Further steps
GameBench config is stored as JSON in the project file ProjectSettings/GameBench.json. You will need to edit this file if you want to set tags, or to control which metrics get collected and at what intervals. Note that for performance reasons this file is not a project asset but gets converted to code at build time. Refer to the Configuration guide for more details.
GameBench may also be controlled and configured from C# script in your game. Common use cases for script are to start and stop sessions when the player enters and exits a particular level or area, also to record markers and tags that correspond to gameplay events.
Uninstallation
To uninstall GameBench just remove the package from Package Manager:
- Open the Package Manager window in Unity.
- Set the ‘Packages’ filter at the top of the window to ‘In Project’.
- Select GameBench from the package list.
- Click the “Remove” button in the bottom right corner. Uninstall will proceed automatically.